
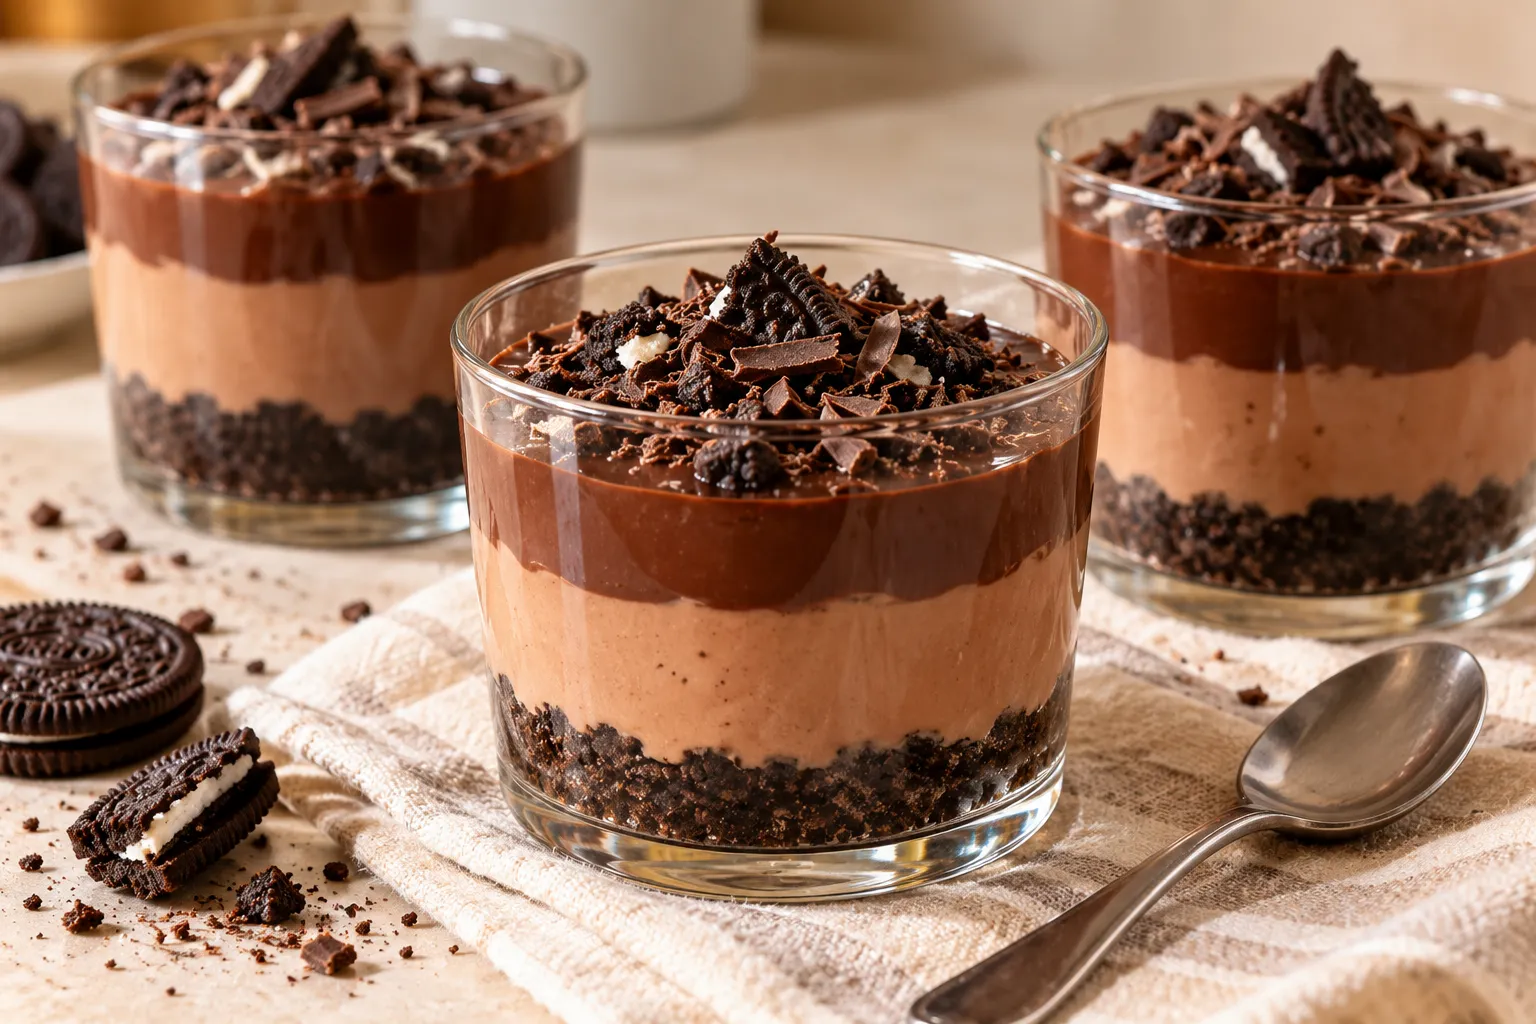
If you love rich chocolate desserts, this Special Triple-Layer Chocolate Pudding with Milo & Oreo is a treat you won’t want to miss. This indulgent homemade dessert combines three delicious layers: a smooth chocolate pudding, a creamy Milo chocolate layer, and a crunchy Oreo biscuit base. Each spoonful delivers a wonderful mix of chocolate flavor, creamy texture, and irresistible cookie crunch.
The best part is that you can prepare this dessert at home using simple ingredients without needing an oven. The layers are easy to make, and after a few hours in the refrigerator, they set into a beautiful pudding dessert that’s perfect for family gatherings, birthday parties, weekend treats, or whenever a chocolate craving strikes.
Whether you serve it in individual dessert cups or assemble it in a large glass dish, this triple-layer chocolate pudding looks impressive and tastes even better. The combination of Milo malt chocolate powder and Oreo cookies gives this dessert a familiar, nostalgic flavor with a rich, bakery-style finish.
Why You’ll Love This Triple-Layer Chocolate Pudding
Three irresistible layers: Enjoy a crunchy Oreo base, a creamy Milo layer, and a rich chocolate pudding topping in every bite.
No oven required: All three layers can be prepared on the stovetop or assembled without baking, making this a convenient dessert for warm days or busy schedules.
Rich chocolate flavor: Cocoa powder and chocolate give the pudding its deep chocolate taste, while Milo adds a distinctive malty sweetness.
Creamy and crunchy textures: The contrast between silky pudding and crushed cookies makes every spoonful satisfying.
Easy to prepare ahead: The dessert needs time to chill, so you can make it several hours before serving.
Perfect for sharing: Prepare it in a large serving dish for a family dessert or portion it into small glasses for parties and special occasions.
Ingredients for Special Triple-Layer Chocolate Pudding
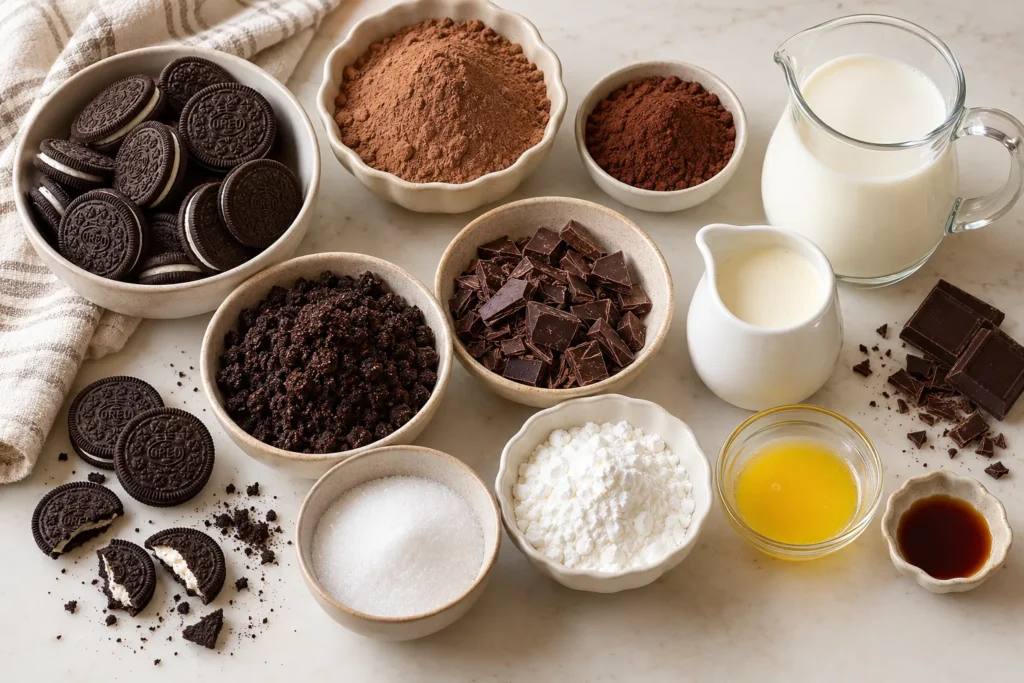
This recipe makes approximately 8 servings, depending on the size of your dessert cups.
Layer 1: Oreo Biscuit Base
- 24 Oreo cookies
- 4 tablespoons (55 g) unsalted butter, melted
The Oreo base provides a chocolate cookie crunch that balances the creamy pudding layers. You can use the whole cookie, including the filling, when crushing the biscuits.
Layer 2: Creamy Milo Pudding
- 500 ml (2 cups) whole milk
- 4 tablespoons Milo malt chocolate powder
- 2 tablespoons granulated sugar, or to taste
- 2 tablespoons cornstarch
- 100 ml (about 1/3 cup plus 1 tablespoon) heavy cream
- 1 teaspoon vanilla extract
- A small pinch of salt
This layer has a creamy texture and a gentle malted chocolate flavor. Adjust the sugar depending on how sweet your Milo powder is.
Layer 3: Rich Chocolate Pudding
- 500 ml (2 cups) whole milk
- 3 tablespoons unsweetened cocoa powder
- 3 tablespoons granulated sugar
- 2 tablespoons cornstarch
- 100 g dark or semisweet chocolate, finely chopped
- 100 ml (about 1/3 cup plus 1 tablespoon) heavy cream
- 1 teaspoon vanilla extract
- A small pinch of salt
The final layer is smooth, glossy, and chocolatey. Semisweet chocolate creates a balanced flavor, while dark chocolate produces a more intense result.
Optional Toppings
- Crushed Oreo cookies
- Milo powder, lightly dusted over the top
- Chocolate shavings
- Mini chocolate chips
- Whipped cream
- Small Oreo cookie pieces
Choose one or two toppings to keep the dessert attractive without overwhelming the three main layers.
Equipment You’ll Need
- A food processor or rolling pin for crushing the cookies
- A mixing bowl
- A small saucepan
- A whisk
- A rubber spatula
- Measuring cups or a kitchen scale
- Eight dessert cups or one medium glass serving dish
- Plastic wrap or airtight covers for chilling
A whisk is especially useful for preventing lumps in the pudding. If you are making the dessert in individual glasses, use a spoon or piping bag to distribute the layers neatly.
How to Make Triple-Layer Chocolate Pudding with Milo & Oreo
Step 1: Crush the Oreo Cookies
Place the Oreo cookies in a food processor and pulse until they become fine crumbs. If you do not have a food processor, put the cookies in a sealed food bag and crush them with a rolling pin.
Transfer the crumbs to a mixing bowl and pour in the melted butter. Stir until the crumbs are evenly coated and resemble damp sand.
The mixture should hold together when pressed between your fingers. If it seems very dry, add a little more melted butter, one teaspoon at a time.
Step 2: Build the Oreo Base
Divide the Oreo mixture between eight dessert cups, or spread it evenly across the bottom of a medium glass dish.
Press the crumbs firmly using the back of a spoon. A compact base helps the dessert hold together when served.
Place the cups or dish in the refrigerator for about 15–20 minutes while you prepare the Milo layer.
For a softer, more spoonable cookie base, press the crumbs gently rather than packing them too tightly.
Step 3: Mix the Milo Pudding Ingredients
In a saucepan, whisk together the cornstarch, Milo powder, sugar, and a small pinch of salt.
Gradually pour in the milk while whisking continuously. Adding the milk slowly helps dissolve the dry ingredients and prevents lumps.
Once the mixture is smooth, add the heavy cream and vanilla extract.
Before heating, check that there are no visible clumps of cornstarch or Milo powder along the bottom or sides of the pan.
Step 4: Cook the Milo Pudding
Place the saucepan over medium-low heat. Whisk continuously as the mixture warms.
After several minutes, the pudding should begin to thicken. Continue cooking gently until it becomes smooth and thick enough to coat the back of a spoon.
Avoid allowing the mixture to boil vigorously. Excessive heat can cause scorching, especially when using malted chocolate powder.
Remove the saucepan from the heat as soon as the pudding reaches the desired consistency.
If a few lumps remain, pass the pudding through a fine-mesh sieve while it is still warm.
Step 5: Add the Milo Layer
Let the Milo pudding cool for a few minutes, stirring occasionally so that the surface does not form a skin.
Spoon or pour it over the chilled Oreo base. Divide it evenly between the cups, or spread it gently across the biscuit layer in the serving dish.
Tap the cups lightly on the counter to help the pudding settle into an even layer.
Refrigerate for approximately 20–30 minutes, or until the surface has started to set. It does not need to be completely firm before you add the next layer, but it should be stable enough to support the chocolate pudding.
Step 6: Prepare the Chocolate Pudding Mixture
In a clean saucepan, whisk together the cocoa powder, sugar, cornstarch, and a pinch of salt.
Gradually add the milk, whisking until the mixture is smooth. Stir in the heavy cream.
Before placing the saucepan over the heat, make sure the cocoa and cornstarch are fully dispersed. This helps create a silky pudding rather than a grainy one.
Step 7: Cook the Chocolate Pudding
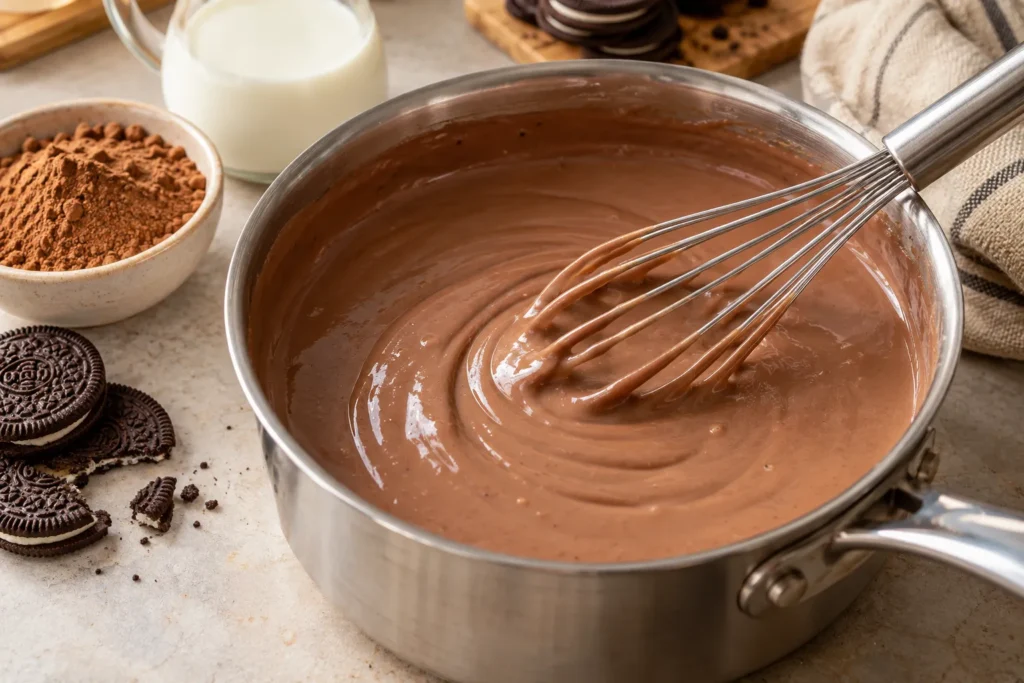
Place the saucepan over medium-low heat and whisk continuously.
As the mixture warms, it will gradually thicken. Continue stirring until the pudding reaches a smooth, spoonable consistency.
Remove it from the heat and immediately add the chopped chocolate. Let it stand for about 30 seconds, then whisk until the chocolate has melted completely.
Stir in the vanilla extract.
The finished pudding should look glossy and have a deep chocolate color. If it seems too thick to pour, whisk in a small splash of warm milk.
Step 8: Add the Final Chocolate Layer
Allow the chocolate pudding to cool for a few minutes, stirring occasionally.
Carefully spoon it over the Milo layer. To keep the layers distinct, pour slowly and use the back of a spoon to guide the pudding across the surface.
If you are using individual glasses, adding the pudding with a small jug or piping bag can make the layers neater.
Do not pour extremely hot pudding directly onto a fully chilled, delicate layer. Letting it cool briefly reduces the risk of disturbing the Milo layer.
Step 9: Chill Until Set
Cover the dessert cups or serving dish and refrigerate for at least 4 hours, preferably longer if you want especially clean layers.
For the best texture, allow the pudding to chill until all three layers are fully set.
Avoid moving the cups around too much during the first part of chilling, as this can disturb the layers before they become firm.
Step 10: Decorate and Serve
Just before serving, add your favorite toppings. Crushed Oreos, a light dusting of Milo powder, and chocolate shavings work particularly well.
For a more elegant presentation, pipe a small swirl of whipped cream on top and finish with a single Oreo piece.
Serve the pudding cold, using a small spoon to scoop through all three layers at once. The combination of crunchy cookie crumbs, malty creaminess, and rich chocolate pudding is what makes this dessert special.
Tips for Perfect Triple-Layer Chocolate Pudding
Whisk the cornstarch before heating. Mixing it with the dry ingredients first and gradually adding cold milk helps prevent lumps.
Cook the pudding gently. Medium-low heat and constant whisking reduce the risk of scorching the milk or chocolate.
Let each layer set slightly. Chilling the Oreo base and Milo layer before adding the next layer helps preserve the distinct appearance of the dessert.
Cool the pudding briefly before layering. Extremely hot pudding may soften the layer underneath and create a less defined finish.
Use full-fat milk for a creamier result. Whole milk gives the pudding a richer texture than skim milk.
Choose chocolate according to your taste. Semisweet chocolate creates a balanced dessert, while dark chocolate gives a deeper cocoa flavor.
Taste before adding extra sugar. Milo and Oreo cookies are already sweet, so the amount of sugar may need adjusting to suit your preferences.
Chill long enough. Four hours is a useful minimum, but overnight chilling generally gives the layers more time to firm up.
Add toppings just before serving. This keeps crushed cookies crisp and prevents decorative toppings from absorbing moisture.
Common Mistakes and How to Fix Them
| Problem | Possible Cause | Solution |
|---|---|---|
| Lumpy pudding | Cornstarch or cocoa was not mixed properly | Whisk the dry ingredients first and add milk gradually |
| Pudding too thin | It was not cooked long enough or contains too little thickener | Cook until it thickens and allow sufficient chilling time |
| Pudding too thick | Too much cornstarch or excessive cooking | Whisk in a little warm milk while the pudding is still warm |
| Layers mix together | The previous layer was too soft or the next layer was too hot | Chill each layer until slightly set and cool the next layer before adding it |
| Burnt flavor | Heat was too high or the pudding was not stirred | Cook over medium-low heat and whisk continuously |
| Oreo base crumbles | Not enough butter or insufficient pressing | Add a little melted butter and press the crumbs evenly |
| Skin forms on the pudding | The surface was exposed to air while cooling | Stir occasionally or cover the surface with food-safe wrap when cooling separately |
Delicious Variations to Try
Triple Chocolate Pudding
For an even richer dessert, use dark chocolate in the final layer and add a few chocolate chips between the Milo and chocolate layers. Keep the additions modest so the pudding still sets properly.
Milo Oreo Pudding Cups
Make the dessert in small clear glasses to show off the layers. This is an excellent option for birthday parties, dinner parties, and dessert tables.
Extra-Creamy Milo Layer
For a softer and creamier malted layer, replace a small amount of the milk with additional cream. Keep the total liquid reasonably close to the original amount so the pudding can still set.
Chocolate Biscuit Pudding
If you cannot find Oreo cookies, use another chocolate sandwich biscuit or plain chocolate biscuits. If using plain biscuits without a cream filling, you may need a little more butter to help the crumbs hold together.
Dark Chocolate Version
Replace the semisweet chocolate with dark chocolate containing approximately 60–70% cocoa. You may want to adjust the sugar slightly depending on how intense you like your chocolate desserts.
Layered Pudding with Whipped Cream
For a lighter-looking finish, add a thin layer of lightly sweetened whipped cream after the chocolate pudding has set. Refrigerate the dessert until serving and keep the whipped cream layer cold.
How to Store Triple-Layer Chocolate Pudding
Because this dessert contains milk and cream, it should be stored in the refrigerator.
In the refrigerator: Cover the dessert cups or serving dish and refrigerate for up to 3 days for the best quality. Keep the dessert cold between servings.
Before serving: Serve directly from the refrigerator. If the dessert has been refrigerated overnight, the layers should be firmer and easier to scoop.
At room temperature: Avoid leaving the pudding out for extended periods. As a general food-safety rule, refrigerate perishable dairy desserts within two hours, or within one hour when temperatures exceed 90°F (32°C).
Freezing: Freezing is not recommended for the best texture. The pudding may become watery or grainy after thawing, and the Oreo base may lose its pleasant texture.
Can You Make This Dessert Ahead of Time?
Yes. This triple-layer chocolate pudding is an excellent make-ahead dessert.
You can prepare it the night before a gathering and let it chill overnight. This gives the pudding layers plenty of time to set and allows you to focus on other preparations on the day of serving.
For the best appearance, add crushed Oreos, chocolate shavings, and whipped cream just before serving. The cookies stay crunchier, and the toppings look fresher.
If you are preparing the dessert for a party, individual glass cups are especially convenient because each portion is ready to serve.
What to Serve with Chocolate Milo Oreo Pudding
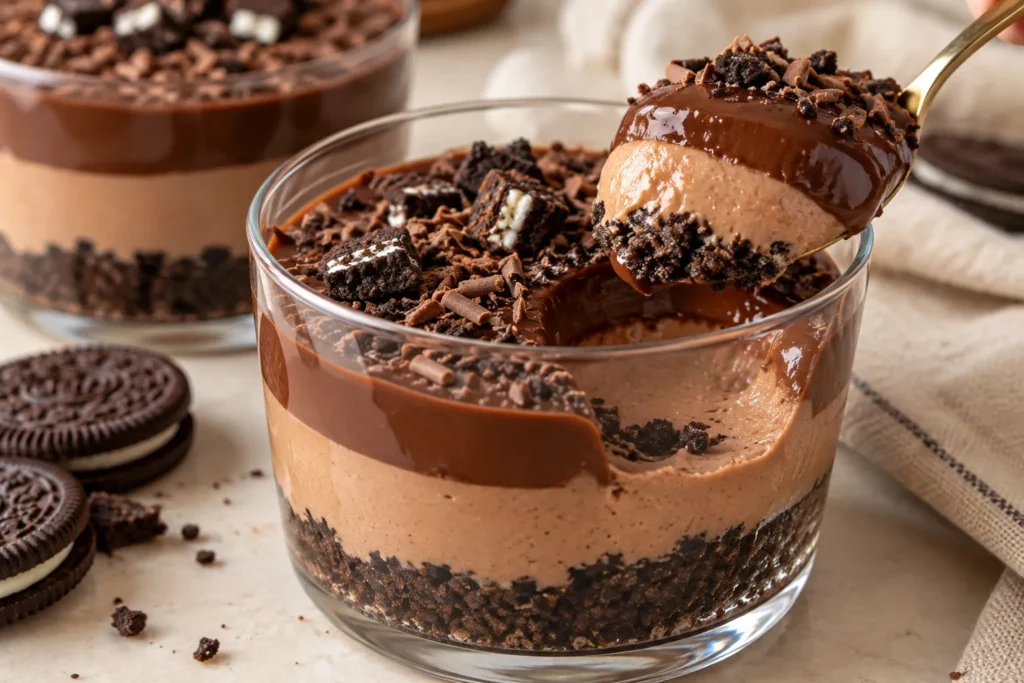
Although this pudding is delicious on its own, you can pair it with simple accompaniments for a more complete dessert spread.
- Fresh strawberries: Their fruity freshness contrasts with the rich chocolate layers.
- Raspberries: Their slight tartness balances the sweetness of Milo and Oreo cookies.
- Coffee: Black coffee or espresso pairs well with the deep chocolate flavor.
- Vanilla ice cream: A small scoop makes the dessert even more indulgent, although the combination is very rich.
- Fresh banana slices: Banana pairs naturally with chocolate and malt flavors. Add it immediately before serving to prevent browning.
- Whipped cream: A small swirl adds lightness and an elegant finish.
Because the pudding is already rich and sweet, small portions and simple accompaniments often work best.
Frequently Asked Questions
What is Milo chocolate pudding?
Milo chocolate pudding is a creamy dessert layer made with milk, Milo malt chocolate powder, and a thickening agent such as cornstarch. Milo gives it a distinctive malted chocolate flavor that differs slightly from a pudding made with cocoa alone.
Can I make this dessert without an oven?
Yes. This recipe does not require an oven. The Oreo base is prepared with crushed biscuits and melted butter, while the two pudding layers are cooked on the stovetop and chilled in the refrigerator.
Can I use instant pudding mix instead?
Yes. You can substitute a prepared chocolate pudding mix for one or both pudding layers if you prefer a quicker method. Follow the package directions and make sure the consistency is suitable for layering. The flavor and texture will differ from the homemade version.
Why is my pudding not setting?
The pudding may not have been cooked long enough for the cornstarch to thicken properly, or the ingredient proportions may be inaccurate. Make sure the mixture thickens on the stovetop before removing it from the heat, and allow enough time in the refrigerator.
Can I make the dessert in one large dish?
Absolutely. Use a medium glass dish and spread each layer evenly. Allow the Milo layer to set slightly before adding the chocolate layer. Chill the finished dessert thoroughly before serving.
Can I use low-fat milk?
You can use low-fat milk, but the pudding may be less rich and creamy. Whole milk is recommended for the best flavor and texture.
Can I reduce the sugar?
Yes. Milo and Oreo cookies already contribute sweetness, so you can reduce the added sugar slightly. Taste the mixtures before cooking where possible, but remember that the final dessert will taste less sweet when using dark chocolate.
How long does the pudding need to chill?
Allow at least 4 hours in the refrigerator. Overnight chilling is even better if you want well-set layers and a convenient make-ahead dessert.
Can I prepare it two days before serving?
Yes, provided it is covered and refrigerated promptly. For the freshest texture, prepare it no more than 1–2 days ahead and add the toppings shortly before serving.
Can children help make this dessert?
Children can help crush the cookies, measure ingredients, and decorate the chilled pudding with supervision. An adult should handle the hot saucepan and any other hot ingredients.
Final Thoughts
This Special Triple-Layer Chocolate Pudding with Milo & Oreo brings together three irresistible textures in one easy homemade dessert. The crunchy Oreo base, creamy malted Milo pudding, and rich chocolate topping create a layered treat that looks impressive without requiring complicated baking techniques.
The recipe is flexible enough for individual dessert cups or a large family serving dish, and you can prepare it ahead of time for birthdays, celebrations, or a simple weekend indulgence.
For the best result, cook the pudding gently, chill each layer enough to keep it distinct, and give the finished dessert plenty of time to set in the refrigerator. Add crushed Oreo cookies and chocolate shavings just before serving for a beautiful final touch.
If you enjoy creamy chocolate desserts, this no-bake pudding is a delicious way to turn everyday ingredients into something special.
Recipe Card
Recipe: Special Triple-Layer Chocolate Pudding with Milo & Oreo
Preparation time: 25 minutes
Cooking time: 20 minutes
Chilling time: At least 4 hours
Total time: Approximately 4 hours 45 minutes
Yield: 8 servings
Category: Dessert, Pudding, No-Bake Dessert
Method: Stovetop and refrigeration
Ingredients
Oreo Base
- 24 Oreo cookies
- 4 tablespoons (55 g) melted unsalted butter
Milo Pudding Layer
- 500 ml whole milk
- 4 tablespoons Milo malt chocolate powder
- 2 tablespoons granulated sugar
- 2 tablespoons cornstarch
- 100 ml heavy cream
- 1 teaspoon vanilla extract
- Pinch of salt
Chocolate Pudding Layer
- 500 ml whole milk
- 3 tablespoons unsweetened cocoa powder
- 3 tablespoons granulated sugar
- 2 tablespoons cornstarch
- 100 g dark or semisweet chocolate, chopped
- 100 ml heavy cream
- 1 teaspoon vanilla extract
- Pinch of salt
Optional Toppings
- Crushed Oreo cookies
- Milo powder
- Chocolate shavings
- Whipped cream
Instructions
- Crush the Oreo cookies into fine crumbs and mix with the melted butter.
- Press the mixture into eight dessert cups or the bottom of a glass serving dish. Refrigerate for 15–20 minutes.
- Whisk the Milo powder, sugar, cornstarch, and salt in a saucepan. Gradually whisk in the milk, then add the cream and vanilla.
- Cook over medium-low heat, whisking continuously, until the Milo mixture thickens.
- Let it cool briefly, then spoon it over the Oreo base. Refrigerate for 20–30 minutes until slightly set.
- In a clean saucepan, whisk the cocoa powder, sugar, cornstarch, and salt. Gradually add the milk, then stir in the cream.
- Cook over medium-low heat, whisking until thickened. Remove from the heat, add the chopped chocolate, and whisk until melted. Stir in the vanilla.
- Cool the chocolate pudding briefly, then carefully spread it over the Milo layer.
- Cover and refrigerate for at least 4 hours, or until fully set.
- Decorate with crushed Oreos, Milo powder, chocolate shavings, or whipped cream just before serving.
Recipe Notes
- Whole milk produces the creamiest texture.
- Whisk the dry ingredients with cold milk before heating to reduce lumps.
- Do not pour very hot pudding over a delicate layer that has already set.
- Chill thoroughly before serving.
- Keep the finished dessert refrigerated and consume within approximately 3 days.
- Nutritional values will vary with the specific brands of cookies, Milo, chocolate, milk, and cream used.